
These are the PHOTOGRAPHERS RULES. You need set the example and keep Photographers as the non-papparazi and the most concerned for the animals. Families occasionally act like the "Owl Prowls" or walks are a Disney attraction with its attendant noise.
So why bother to photograph the owls, the very icon of wisdom? The more people realize they are in habitat that is perhaps not far away and could be threatened, the more people will care about them and preserving the woods they live in.
EQUIPMENT:
I use a Canon DSLR with a 70-200 Canon Zoom with a 2X tele-extender to make an effective 140-400 zoom. This is the shortest I consider for birds. Owls can come close to you at night, so in some cases you might get lucky with a 300mm. ISO Setting is usually 400, above that, yes, noise still becomes a factor. Shutter speed (Tv) mode at 1/200. Normal one-shot everything else.
I also use a top mounted Smart flash, in this case a Canon 580. You don't know ahead how close the owls will appear, so use the most powerful flash you have, to be able to light the bird from a distance. And a FOCUSING LIGHT on the lens Tripod mount. Here is the ingenuity part.

CALIBRATION STEP (KEY TO SUCCESS):
Now turn your focusing light on, being careful not to shine it in the owls face or any other people on the walk. Be aware that the owl is now getting nervous as long as the light is on. Pick a tree at about the same distance and align the focusing light in your camera finder looking at the tree. You are now "calibrated." Turn back 180 degrees back to the owl, compose and shoot as soon as the camera focuses. You probably won't get a second shot. Many failures happen here. Try the calibration procedure at home one evening with the lights dimmed so you get the concept down of aiming the light on what you will photograph. You will not want to fumble with the mechanics in the dark.
OWL SHOOTING CHECKLIST:
- Camera
- Long Lens
- Flash
- FOCUSING LIGHT
- Astronomy Red Light
- Charged Spare Batteries
- Adequate Card Capacity
- Camera Bag
- Appropriate gloves to stay warm and still operate the camera.

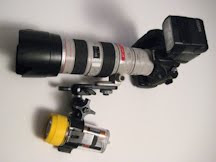
The assembled focusing light is adapted from a SCUBA Diving light and pivots to adjust for parallax of varying distances to the owl. You can devise your own method but just be aware that asking someone to successfully hold a focusing light steady on an owl while you compose is a real crap-shoot. The assembly here will be aimed with a friction fit on the adjustable knob pictured below. The light can shift position while you are walking so take note of the quick calibration step toward the end of this article.

Here is the breakdown of my components, the numbers are in the shot below:
1 An Ikelite Mini-C-Light www.Ikelite.com. (very bright) Available through Dave Hass.
2 Ikelite 4074.1 Mini C-Light Clamp with pivot. Also available through Dave.
3. Short (2 Inch) section of 5/8 inch diameter pipe from a hardware store. I used a hacksaw to cut the section and then wrapped duct tape around the lower inch to get a good seal in the Ikelite Clamp. One end goes in the Ikelite clamp held in by tightening the knob , the other end goes in the Manfrotto Platform held in with a handscrew.
4. Manfrotto Camera Platform for Magic Arm 143BKT (under $15 at most outlets).
WHERE DO I FIND THE OWLS?
Ah, very important aspect. Owls are pervasive. We are fortunate to have them in every park in Staten Island. Most prevalent are Eastern Screech Owls, but we do have Great Horned Owls and others. Many organizations devoted to nature have organized "Owl Prowls." These are guided after dark walks. I go with the Protectors of Pine Oak Woods in Staten Island.
Ah, very important aspect. Owls are pervasive. We are fortunate to have them in every park in Staten Island. Most prevalent are Eastern Screech Owls, but we do have Great Horned Owls and others. Many organizations devoted to nature have organized "Owl Prowls." These are guided after dark walks. I go with the Protectors of Pine Oak Woods in Staten Island.
Note that a bit of etiquette is in order. Owls don't just fly up to you. Your guide will hopefully be talented enough to call the owls and perhaps they will be curious enough to approach within shooting distance. They will do so if the group you're with is "small" enough and QUIET. This means being aware of stepping on leaves, crusty snow, branches and NOT talking much.
Only mature children who understand this thoroughly should be allowed to accompany parents on these type of walks. Otherwise, they will scare the Night Birds with NORMAL hiking noises. Breathe quietly, assist and listen for the DIRECTION OF THE RETURN OWL calls as response to the guide. Point with a raised arm and a whisper. DONT shout "YO DUDE, I HEAR AN OWL IN THAT DIRECTION."
You may get more than one owl responding to the calls and the "intelligence" now can be pretty exciting figuring out if there are more than one owl or one is moving and tracking YOU. Silent running is the rule.
WALKING LIGHTS:
Because you want to get accustomed to the dark, you should not use the focusing light until you see an owl. Use NO LIGHT or a dim red Astronomy flashlight to see your way in the woods. A full moon is a great help.
Because you want to get accustomed to the dark, you should not use the focusing light until you see an owl. Use NO LIGHT or a dim red Astronomy flashlight to see your way in the woods. A full moon is a great help.
YOU PROBABLY GET ONE SHOT AT THE OWL:
You need to be aware that you are invading the territory of a nocturnal predator. Their eyes are very sensitive. You are going to be shining your light in their eyes for a moment long enough for the camera to focus and take your shot. The preflashes generated by the system to focus the camera will begin to freak out the owl. Due to the shallow depth of field, manual focusing is not a practical option. Chances are that you will probably get ONLY one shot and the owl flies off only annoyed and not temporarily blinded.
You need to be aware that you are invading the territory of a nocturnal predator. Their eyes are very sensitive. You are going to be shining your light in their eyes for a moment long enough for the camera to focus and take your shot. The preflashes generated by the system to focus the camera will begin to freak out the owl. Due to the shallow depth of field, manual focusing is not a practical option. Chances are that you will probably get ONLY one shot and the owl flies off only annoyed and not temporarily blinded.
SHOOT THE OWL:
When you are close enough to see an owl, don't be a CREATURE HOG. Let the group enjoy this encounter with a magnificent creature for a few moments, maybe 30 seconds. Whisper your intentions to the guide and turn on your camera, flash and FACE 180 degress to the owl. Your subsequent actions will eventually scare away the owl.
When you are close enough to see an owl, don't be a CREATURE HOG. Let the group enjoy this encounter with a magnificent creature for a few moments, maybe 30 seconds. Whisper your intentions to the guide and turn on your camera, flash and FACE 180 degress to the owl. Your subsequent actions will eventually scare away the owl.
CALIBRATION STEP (KEY TO SUCCESS):
Now turn your focusing light on, being careful not to shine it in the owls face or any other people on the walk. Be aware that the owl is now getting nervous as long as the light is on. Pick a tree at about the same distance and align the focusing light in your camera finder looking at the tree. You are now "calibrated." Turn back 180 degrees back to the owl, compose and shoot as soon as the camera focuses. You probably won't get a second shot. Many failures happen here. Try the calibration procedure at home one evening with the lights dimmed so you get the concept down of aiming the light on what you will photograph. You will not want to fumble with the mechanics in the dark.
EXPECTATIONS: Overall, consider yourself lucky if you just hear an owl. Seeing one is by no means guaranteed and getting a good photo is even less likely. Be patient. Figure this will take several evenings of walks to get close and get the hang of it. Good hunting and respect the owls!
OWL SHOOTING CHECKLIST:
- Camera
- Long Lens
- Flash
- FOCUSING LIGHT
- Astronomy Red Light
- Charged Spare Batteries
- Adequate Card Capacity
- Camera Bag
- Appropriate gloves to stay warm and still operate the camera.
For more on Owl behavior, here is a great book: Wesley the Owl.
PS A tribute to the late Alison Steele, DJ of WNEW-FM in the 1970's. I met her once. She referred to herself as the "Night Bird." I will never forget her.


