

Showing posts with label updates. Show all posts
Showing posts with label updates. Show all posts
Wednesday, February 10, 2010
SOFTWARE: Aperture 3 Released
Apple has released Aperture 3. Click here for more info. Aperture is Apple's competitor to Adobe's Lightroom. Meaning it is a combination RAW converter, organizer, limited editor and "workflow" tool. If you shoot RAW and work with a lot of photos, you need one of these. A big plus for Aperture 3 is that is now handles video. Lightroom Version 2.6 currently does not. Version 3 is in Beta.

Thursday, October 29, 2009
Lightroom 3.0 Beta is Available

(Click on image to enlarge)
I live in Lightroom so this is a big deal.According to Abobe:
Some of the new features included for you to play with in the Lightroom 3 beta are:
- Brand new performance architecture, building for the future of growing image libraries
- State-of-the-art noise reduction to help you perfect your high ISO shots
- Watermarking tool that helps you customize and protect your images with ease
- Portable sharable slideshows with audio—designed to give you more flexibility and impact on how you choose to share your images, you can now save and export your slideshows as videos and include audio
- Flexible customizable print package creation so your print package layouts are all your own
- Film grain simulation tool for enhancing your images to look as gritty as you want
- New import handling designed to make importing streamlined and easy
- More flexible online publishing options so you can post your images online to certain online photo sharing sites directly from inside Lightroom 3 beta (may require third-party plug-ins)*
http://labs.adobe.com/technologies/lightroom3/
Sunday, October 18, 2009
BASICS: Using the Levels Tool to get WOW!
The worst comment a photographer can get on their work is "NICE" or "INTERESTING." If your photography is not generating WOW reactions, this technique could help. Many factors of course effect the WOW reaction, but for photos to be dramatic or LEAP off the page, you must edit using some kind of Editor such as Photoshop Elements, Paintshop pro or iPhoto.
Despite all the marketing, digital cameras do not always produce perfect photos. Today's cameras are after all, dumb computers with a lens attached. An Editor can quickly correct TONAL RANGE problems, the factor that is responsible for photos looking muddy or "lacking something."
The quickest way to get the most out of the tonal range is to use the LEVELS tool to set the White point, Black Point and Contrast or Gamma. A Japanese photographer named Sammy (Masafumi Tanaka) taught me how to do this in five minutes in the Maldives back in 2003. It got me hooked on the power of digital editing. As this is a powerful tool that changes the picture, you may want to first make a copy of the file as you practice. You can also CLOSE the picture without saving if you are not happy with the results.
1. Open the Editor application. In this example, we are using Photoshop Elements.
2. Open a picture
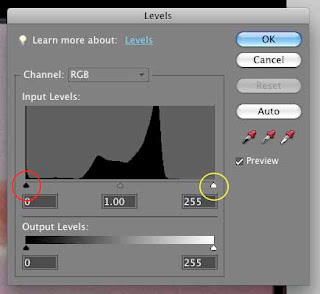
3. Press the COMMAND + L keys (Mac) or CTRL + L (Win) and the following histogram shows up. Very similar to your camera histogram. In iPhoto, click Edit your picture and click the Adjust Icon. For others, check for Levels help.
In this example, the photo has poor tonal range in both the shadows (to the left) and the highlights (to the right). This shape of the Histogram "mountain" tells us this. The picture will have a muddy quality to it. Using the controls it is easy to improve this picture.
1. Click and hold your left mouse button on the White Point slider, circled here in Yellow.
2. Drag it toward the left until it almost touches the "mountain" of the Histogram.
3. Repeat with the Black Point slider, circled here in Red.
4. Drag it toward the right until it almost touches the other side of the "mountain."
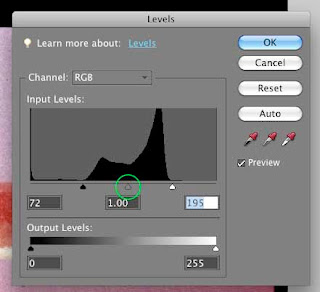
Your picture will appear "crisper"and the controls will be in their new positions as shown:
The last control is to adjust the center Gamma slider (or Contrast) circled in green. Click and hold and move to the left and right slightly to see the effect and leave it where you think best.
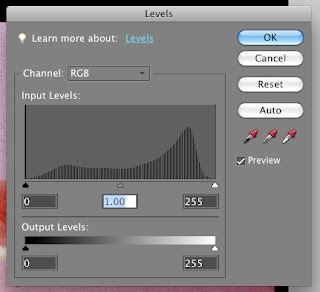
Save your picture when you are happy with the result.
If you reopen the Levels tool, the changes to the histogram are evident showing a much better tonal range, one step closer to WOW! Once you are proficient with Levels, it will be time to explore the next step up in editing sophistication, the Curves Tool.
Subscribe to:
Posts (Atom)


