Showing posts with label digital photography tips. Show all posts

Tuesday, February 9, 2010

INTERMEDIATE PHOTOSHOP: Converting Color Negatives

There are many methods to convert scans of Color Negatives to Positives. Some work better than others. I work extensively in Adobe Lightroom and have not been happy with the results of the plug-ins I have tried for that program. Here is a relatively simple, quality method that relies on your ability to do basic color correction and cleanup in Photoshop. CS4 is used here and must be done on one image at a time. Notes are made for Photoshop Elements Users, I have Version 6.0 on the Mac. More methods will be discussed in subsequent posts.


This is a surface shot of boats in Los Islotes, Mexico. BE RESPONSIBLE FOR YOURSELF. ALWAYS TRY EDITS ON A DUPLICATE IMAGE. NEVER TRY NEW EDITING TECHNIQUES ON YOUR ONLY COPY. PHOTOSHOP unlike Lightroom IS DESIGNED FOR DESTRUCTIVE EDITING AND CHANGES PIXELS.

1. Load your image in Photoshop and go to CURVES (Mac: Command + M; Win: Ctrl + M).

1A. For Photoshop Elements Users: Load your Image and go to LEVELS (Mac: Command + L; Win: Ctrl + L).

2. Select the White Point Dropper inside the green circle on the right, as shown above.

3. Click on a "likely" white object in your scene as shown in the left hand green circle, and click OK to close.
This may be tricky to find the correct spot, so be patient, this is an art not a science. You may need to cancel and do this a number of times until you get an image below that is fairly close to what you expect. You are essentially picking a spot that will tell Photoshop how to remove the orange mask in the Negative. As this is not an automated action, the film stock/mask (Kodak, Fuji) does not matter. One would think that someone would come up with a reliable, duplicatable conversion that measures the orange mask of Fuji vs Kodak vs Agfa, Konica, et. al.

4. Use the INVERT command (Image / Adjustment / Invert) or (Mac: Command + I; Win: Ctrl + I)
(4a For Photoshop Elements Users: Filter / Adjustments/ Invert) or (Mac: Command + I; Win: Ctrl + I)


This image is dirty and slightly off color but somewhat close compared to the negative. Now you need to use your established editing skills to polish up the color to something acceptable.


Final result is pretty good. The colors are believable and the sky is cleaned of dust and dirt despite having been cleaned before scanning.

If anyone has suggestions for reliable BATCH methods, I will be happy to try them out. I am hoping the next version of Lightroom has something that will be "of industrial strength."

Click here to see other images from Los Islotes, LaPaz, Mexico.

Friday, February 5, 2010

PHOTOGRAPHING OWLS - The Night Birds

Photographing birds can sometimes be like trying to photograph a baseball being thrown at you. Owls are not nearly as hard as that. Most likely when you finally see an owl, it will be still and resting on a nearby tree branch watching you before you see them. Such are the Night Birds. It just requires patience, a willingness to go out on cold nights, good stalking instincts, some ingenuity and luck.

These are the PHOTOGRAPHERS RULES. You need set the example and keep Photographers as the non-papparazi and the most concerned for the animals. Families occasionally act like the "Owl Prowls" or walks are a Disney attraction with its attendant noise.

So why bother to photograph the owls, the very icon of wisdom? The more people realize they are in habitat that is perhaps not far away and could be threatened, the more people will care about them and preserving the woods they live in.

EQUIPMENT:
I use a Canon DSLR with a 70-200 Canon Zoom with a 2X tele-extender to make an effective 140-400 zoom. This is the shortest I consider for birds. Owls can come close to you at night, so in some cases you might get lucky with a 300mm. ISO Setting is usually 400, above that, yes, noise still becomes a factor. Shutter speed (Tv) mode at 1/200. Normal one-shot everything else.

I also use a top mounted Smart flash, in this case a Canon 580. You don't know ahead how close the owls will appear, so use the most powerful flash you have, to be able to light the bird from a distance. And a FOCUSING LIGHT on the lens Tripod mount. Here is the ingenuity part.
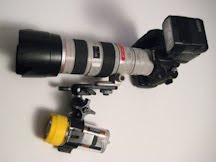

The assembled focusing light is adapted from a SCUBA Diving light and pivots to adjust for parallax of varying distances to the owl. You can devise your own method but just be aware that asking someone to successfully hold a focusing light steady on an owl while you compose is a real crap-shoot. The assembly here will be aimed with a friction fit on the adjustable knob pictured below. The light can shift position while you are walking so take note of the quick calibration step toward the end of this article.


Here is the breakdown of my components, the numbers are in the shot below:
1 An Ikelite Mini-C-Light www.Ikelite.com. (very bright) Available through Dave Hass.
2 Ikelite 4074.1 Mini C-Light Clamp with pivot. Also available through Dave.
3. Short (2 Inch) section of 5/8 inch diameter pipe from a hardware store. I used a hacksaw to cut the section and then wrapped duct tape around the lower inch to get a good seal in the Ikelite Clamp. One end goes in the Ikelite clamp held in by tightening the knob , the other end goes in the Manfrotto Platform held in with a handscrew.
4. Manfrotto Camera Platform for Magic Arm 143BKT (under $15 at most outlets).


WHERE DO I FIND THE OWLS?
Ah, very important aspect. Owls are pervasive. We are fortunate to have them in every park in Staten Island. Most prevalent are Eastern Screech Owls, but we do have Great Horned Owls and others. Many organizations devoted to nature have organized "Owl Prowls." These are guided after dark walks. I go with the Protectors of Pine Oak Woods in Staten Island.

Note that a bit of etiquette is in order. Owls don't just fly up to you. Your guide will hopefully be talented enough to call the owls and perhaps they will be curious enough to approach within shooting distance. They will do so if the group you're with is "small" enough and QUIET. This means being aware of stepping on leaves, crusty snow, branches and NOT talking much.

Only mature children who understand this thoroughly should be allowed to accompany parents on these type of walks. Otherwise, they will scare the Night Birds with NORMAL hiking noises. Breathe quietly, assist and listen for the DIRECTION OF THE RETURN OWL calls as response to the guide. Point with a raised arm and a whisper. DONT shout "YO DUDE, I HEAR AN OWL IN THAT DIRECTION."

You may get more than one owl responding to the calls and the "intelligence" now can be pretty exciting figuring out if there are more than one owl or one is moving and tracking YOU. Silent running is the rule.

WALKING LIGHTS:
Because you want to get accustomed to the dark, you should not use the focusing light until you see an owl. Use NO LIGHT or a dim red Astronomy flashlight to see your way in the woods. A full moon is a great help.

YOU PROBABLY GET ONE SHOT AT THE OWL:
You need to be aware that you are invading the territory of a nocturnal predator. Their eyes are very sensitive.
You are going to be shining your light in their eyes for a moment long enough for the camera to focus and take your shot. The preflashes generated by the system to focus the camera will begin to freak out the owl. Due to the shallow depth of field, manual focusing is not a practical option. Chances are that you will probably get ONLY one shot and the owl flies off only annoyed and not temporarily blinded.

SHOOT THE OWL:
When you are close enough to see an owl, don't be a CREATURE HOG. Let the group enjoy this encounter with a magnificent creature for a few moments, maybe 30 seconds. Whisper your intentions to the guide and turn on your camera, flash and FACE 180 degress to the owl. Your subsequent actions will eventually scare away the owl.

CALIBRATION STEP (KEY TO SUCCESS):
Now turn your focusing light on, being careful not to shine it in the owls face or any other people on the walk. Be aware that the owl is now getting nervous as long as the light is on. Pick a tree at about the same distance and align the focusing light in your camera finder looking at the tree. You are now "calibrated." Turn back 180 degrees back to the owl, compose and shoot as soon as the camera focuses. You probably won't get a second shot. Many failures happen here. Try the calibration procedure at home one evening with the lights dimmed so you get the concept down of aiming the light on what you will photograph. You will not want to fumble with the mechanics in the dark.

EXPECTATIONS: Overall, consider yourself lucky if you just hear an owl. Seeing one is by no means guaranteed and getting a good photo is even less likely. Be patient. Figure this will take several evenings of walks to get close and get the hang of it. Good hunting and respect the owls!

OWL SHOOTING CHECKLIST:
- Camera
- Long Lens
- Flash
- FOCUSING LIGHT
- Astronomy Red Light
- Charged Spare Batteries
- Adequate Card Capacity
- Camera Bag
- Appropriate gloves to stay warm and still operate the camera.

For more on Owl behavior, here is a great book: Wesley the Owl.

PS A tribute to the late Alison Steele, DJ of WNEW-FM in the 1970's. I met her once. She referred to herself as the "Night Bird." I will never forget her.

Tuesday, December 8, 2009

"It's the Nut Behind The Butt"

Photographs are effective if other people respond to them. Period. The iconic photo by Eddie Adams, of a Vietnamese prisoner being executed, is a case in point of a negative response.

Technically the photo was a little blurry, but it still stands as one of the most memorable of that very photographed war. It catapulted Eddie Adams career as the consummate pro. At the same time, it probably would never be accepted by my Stock Photo Agency as professional quality. Blurry. "Poorly defined"

Cameras are a lot like Golf clubs and Tennis rackets. You must learn the game and practice, otherwise, the results will be pedestrian and technically correct snapshots. People will continue to lust after more, more features, especially more megapixels. Teenagers in particular are more versed in iPod features than History. Wrong. We need to produce pictures that others care about. Sharing is the objective of most of photography.

As an Army friend once told me regarding rifle specifications, "it is the Nut behind the {rifle} butt." The meaning is, it is the skill and knowledge of the operator that counts, not the instrument.

The Photo below was taken in the wonderful town of Ravello, on the Amalfi Coast of Italy. The endearing Siamese Cat knew to get positioned perfectly for lunch morsels. Don't you just melt at those blue eyes? I shot straight down to take advantage of the Tile background against the white fur. The camera? A defunct 2.0 megapixel Minolta shirt pocket camera. How much better would the latest 20+ MB DSLR performed? Aside: I HAD the Shirt Pocket camera with me and AVAILABLE to shoot.


We need to lust after the camera features that people should care about: larger sensors, intuitive controls, low shutter lag, low light performance, manual control, quick shooting capability, low noise, not megapixels. In other words make digital more like film.

Still, "It's the Nut Behind The Butt."

Click here to see more from the Italy gallery of the Amalfi Coast.

Wednesday, November 11, 2009

NEWBIE: Basic Book on Digital Photography

I spent an hour today at the NYC 14th Street Barnes & Noble to see what the latest BASIC books on photography were worth recommending. There were certain criteria:

1. Short, as opposed to Encyclopedic. Beginners need a few topics to master, then get into the weeds of detail.

2. Emphasized traditional, essential conceptual photographic topics, rather than Megapixels or technology and marketing blather

3. Visually appealing and easy to follow.

4. "Inexpensive." A newbie is not going to spend $600 of the household piggy bank on learning RosettaPhotoGraphy if there is only budding interest in a potential fad.

There were a few that came close and only one hands down winner:


1. It is only 160 pages. Short.

2. Arranged by topics of:
  • All that digital stuff
  • Aperature
  • Shutter Speed
  • Light
  • Composition
  • Photoshop Digital Darkroom
  • Index
As a beginner, Peterson hits the required grounding of the principles of Photography.

3. Visually Appealing. Well laid out. Not a "technical slog" that will end up thrown out next year with the next release of Photoshop.

4. Inexpensive. List is $26 US. I got it for $21 minus my additional B&N discount. Less than that is nothing and would be worth every penny you paid. May be cheaper on Amazon (Link below) depending on shipping.


Thursday, October 29, 2009

Lightroom 3.0 Beta is Available


(Click on image to enlarge)

I live in Lightroom so this is a big deal.

According to Abobe:
Some of the new features included for you to play with in the Lightroom 3 beta are:

  • Brand new performance architecture, building for the future of growing image libraries
  • State-of-the-art noise reduction to help you perfect your high ISO shots
  • Watermarking tool that helps you customize and protect your images with ease
  • Portable sharable slideshows with audio—designed to give you more flexibility and impact on how you choose to share your images, you can now save and export your slideshows as videos and include audio
  • Flexible customizable print package creation so your print package layouts are all your own
  • Film grain simulation tool for enhancing your images to look as gritty as you want
  • New import handling designed to make importing streamlined and easy
  • More flexible online publishing options so you can post your images online to certain online photo sharing sites directly from inside Lightroom 3 beta (may require third-party plug-ins)*

http://labs.adobe.com/technologies/lightroom3/