
Click here to see the Adorama Specials for this week. Lots of photo equipment featured.
.
Friday, March 5, 2010
Thursday, March 4, 2010
NEW IDEA - Pentax Optio W90
We like new thinking, new ideas and innovation. Not "Me too!" Here is a point and shoot from Pentax that looks interesting.

What's new:
Click here to see the dPreview review.
Click here to go to the Pentax site.
Click here to see my Underwater galleries.
-

What's new:
- Three small flash units that surround the lens like a ringflash
- Close macro capability, "Digital Microscope" mode (reason for the flash units)
- Waterproof to 20'
Click here to see the dPreview review.
Click here to go to the Pentax site.
Click here to see my Underwater galleries.
-
Tuesday, March 2, 2010
NEW SPEAKING ENGAGEMENTS ADDED - MANATEES
We are just back from Florida where we were photographing the Manatees of Crystal River. Check here soon for links to the articles that we wrote for DivePhotoGuide.com. The articles will cover shooting Manatees and the logistics of swimming with them and human interactions with these magnificent creatures.
Check the schedule to the left for dates for the presentations.

In the meantime, click here to see some of the photos from the trip.
.
Check the schedule to the left for dates for the presentations.

In the meantime, click here to see some of the photos from the trip.
.
Wednesday, February 10, 2010
BENEATH THE SEA PRESENTATIONS
We are proud to announce that we have been accepted to present the following programs at Beneath the Sea, Meadowlands Exposition Center, New Jersey, the largest expo on SCUBA Diving in the country. Prior registration is essential for the workshop, seating is limited.
Saturday, March 27, 2010 1:00 - 4:00pm Digital Workshop - Beneath-The-Sea Conference "Digitizing, Organizing and Protecting your Photos."

Sunday, March 28, 2010 2:00 - 3:00pm Seminar at Beneath-The-Sea Conference. La Paz, Mexico and the Sea Lions of Los Islotes. Meadowlands Exposition Center.
See the Beneath the Sea Website for tickets. http://www.beneaththesea.org/workshops.h
.
SOFTWARE: Aperture 3 Released
Apple has released Aperture 3. Click here for more info. Aperture is Apple's competitor to Adobe's Lightroom. Meaning it is a combination RAW converter, organizer, limited editor and "workflow" tool. If you shoot RAW and work with a lot of photos, you need one of these. A big plus for Aperture 3 is that is now handles video. Lightroom Version 2.6 currently does not. Version 3 is in Beta.


Tuesday, February 9, 2010
INTERMEDIATE PHOTOSHOP: Converting Color Negatives
There are many methods to convert scans of Color Negatives to Positives. Some work better than others. I work extensively in Adobe Lightroom and have not been happy with the results of the plug-ins I have tried for that program. Here is a relatively simple, quality method that relies on your ability to do basic color correction and cleanup in Photoshop. CS4 is used here and must be done on one image at a time. Notes are made for Photoshop Elements Users, I have Version 6.0 on the Mac. More methods will be discussed in subsequent posts.
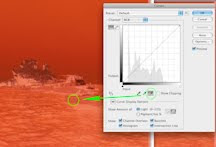
This is a surface shot of boats in Los Islotes, Mexico. BE RESPONSIBLE FOR YOURSELF. ALWAYS TRY EDITS ON A DUPLICATE IMAGE. NEVER TRY NEW EDITING TECHNIQUES ON YOUR ONLY COPY. PHOTOSHOP unlike Lightroom IS DESIGNED FOR DESTRUCTIVE EDITING AND CHANGES PIXELS.
1. Load your image in Photoshop and go to CURVES (Mac: Command + M; Win: Ctrl + M).
1A. For Photoshop Elements Users: Load your Image and go to LEVELS (Mac: Command + L; Win: Ctrl + L).
2. Select the White Point Dropper inside the green circle on the right, as shown above.
3. Click on a "likely" white object in your scene as shown in the left hand green circle, and click OK to close.
This may be tricky to find the correct spot, so be patient, this is an art not a science. You may need to cancel and do this a number of times until you get an image below that is fairly close to what you expect. You are essentially picking a spot that will tell Photoshop how to remove the orange mask in the Negative. As this is not an automated action, the film stock/mask (Kodak, Fuji) does not matter. One would think that someone would come up with a reliable, duplicatable conversion that measures the orange mask of Fuji vs Kodak vs Agfa, Konica, et. al.
4. Use the INVERT command (Image / Adjustment / Invert) or (Mac: Command + I; Win: Ctrl + I)
(4a For Photoshop Elements Users: Filter / Adjustments/ Invert) or (Mac: Command + I; Win: Ctrl + I)
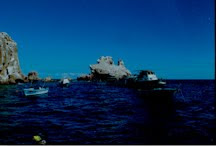
This image is dirty and slightly off color but somewhat close compared to the negative. Now you need to use your established editing skills to polish up the color to something acceptable.
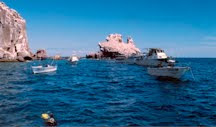
Final result is pretty good. The colors are believable and the sky is cleaned of dust and dirt despite having been cleaned before scanning.
If anyone has suggestions for reliable BATCH methods, I will be happy to try them out. I am hoping the next version of Lightroom has something that will be "of industrial strength."
Click here to see other images from Los Islotes, LaPaz, Mexico.
Friday, February 5, 2010
Subscribe to:
Posts (Atom)


