Saturday, December 26, 2009

DIVE PHOTOGUIDE HAS A NEW FOCUS

See the New DivePhotoGuide.com ( DPG ).

New graphics and focus on learning Underwater Photography. We will be there to help.
John

http://www.divephotoguide.com/

Tuesday, December 8, 2009

"It's the Nut Behind The Butt"

Photographs are effective if other people respond to them. Period. The iconic photo by Eddie Adams, of a Vietnamese prisoner being executed, is a case in point of a negative response.

Technically the photo was a little blurry, but it still stands as one of the most memorable of that very photographed war. It catapulted Eddie Adams career as the consummate pro. At the same time, it probably would never be accepted by my Stock Photo Agency as professional quality. Blurry. "Poorly defined"

Cameras are a lot like Golf clubs and Tennis rackets. You must learn the game and practice, otherwise, the results will be pedestrian and technically correct snapshots. People will continue to lust after more, more features, especially more megapixels. Teenagers in particular are more versed in iPod features than History. Wrong. We need to produce pictures that others care about. Sharing is the objective of most of photography.

As an Army friend once told me regarding rifle specifications, "it is the Nut behind the {rifle} butt." The meaning is, it is the skill and knowledge of the operator that counts, not the instrument.

The Photo below was taken in the wonderful town of Ravello, on the Amalfi Coast of Italy. The endearing Siamese Cat knew to get positioned perfectly for lunch morsels. Don't you just melt at those blue eyes? I shot straight down to take advantage of the Tile background against the white fur. The camera? A defunct 2.0 megapixel Minolta shirt pocket camera. How much better would the latest 20+ MB DSLR performed? Aside: I HAD the Shirt Pocket camera with me and AVAILABLE to shoot.


We need to lust after the camera features that people should care about: larger sensors, intuitive controls, low shutter lag, low light performance, manual control, quick shooting capability, low noise, not megapixels. In other words make digital more like film.

Still, "It's the Nut Behind The Butt."

Click here to see more from the Italy gallery of the Amalfi Coast.

Friday, December 4, 2009

HDR #2 - High Dynamic Range - Using Photomatix Pro

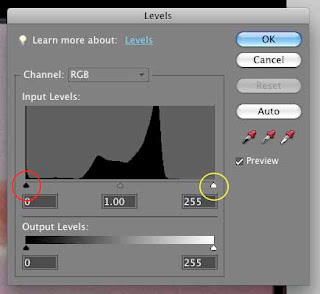
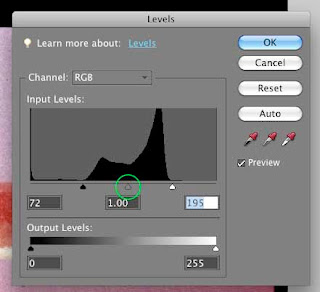
There are different versions of Photomatix, but this post is designed to give you an idea of the controls you can use to effect an illustrative effect that the plug-in is capable of producing.

Rule #1 for Photomatix is don't be afraid to "play."

I like to use the dashboard more or less in order, starting at the top and working down. Be bold with changing settings to experiment.

Strength On the dashboard of controls, you will get the biggest "bang for the buck" by starting with Strength at 100%. It will give the most photo illustrative effect. The lower you go, the more photo-real it will appear.

Saturation at 100 is more Illustrative. At low settings, you can produce B&W.

Set Luminosity at 10 to begin and adjust from there.

Light Smoothing has five radio button settings. I usually like the second button. Experiment.

Microcontrast settings are a matter of taste and small adjustments count for large swings.

The remaining controls will have a less dramatic impact on the image but experiment to see what you like. Below is the product of combining the seven exposures and using Photomatix Pro.


Click here to see a larger version of this photo and more HDR.

Sunday, November 22, 2009

HDR#1 - SHOOTING HIGH DYNAMIC RANGE (HDR)


HDR using PHOTOMATIX PRO (above)


Straight HDR from Photoshop CS4


"Best Normal Exposure" from the series. Non-HDR.

NOTE: This is an introductory article, not a comprehensive how-to with all the possible permutations. The best HDR effects also uses a Photoshop Plugin called Photomatix from HDRSoft. HDR with Photomatix or Photomatix Pro requires some patience fiddling with new software, and a willingness to learn a whole new dashboard of controls.

HIGH DYNAMIC RANGE (HDR) photography is a relatively new technique that is in demand. It can be simply photographic with added detail or illustrative with an exaggerated look. Ever since Ansel Adams worked with the Zone system in film days, we have been trying to force the camera be able to deal with the extended brightness range that our eyes can see. We can adapt to an 11 f/stop range while the best digital cameras can see about 5 f/stops. It still amuses me when people say they only want "what the camera saw." How limiting when they saw so much more. So what to do? Plan ahead and shoot with HDR in mind.

HDR requires Photoshop CS2 or better. I am using CS4. As of this writing it is not available in Photoshop Elements. HRD software may be available as a plugin or other standalone.

The technique works best with still life subjects or scenes without too much movement. The reason is that you are making at least three or more different exposures and allowing Photoshop to "stitch together" the tones. Too much motion beyond a waterfall may get totally lost. Set your camera to shoot in APERATURE PRIORITY mode.

Aperature priority is needed so the focus and depth of field does not change. You start with underexposure of at least two stops, normal and at least two stops overexposure. You can shoot additional exposures beyond the two stop range as well.

You can also set your camera to do this automatically by setting it to Auto Exposure Bracketing, (AEB in Canon cameras that have the feature). Drive mode should be Continuous Shooting, not One Shot. You need to shoot at least three to seven shots of different exposures. Get to be best friend with your camera manual.

Find a nice location that has lots of highlights and deep shadows. Set your camera on a tripod begin your exposure series. See my HDR gallery for examples.

When you are back at the computer after you download, identify the range of files you shot. Ideally you shot a minimum of three shots, perhaps more with different exposures. Start Photoshop and find the files using FILE > AUTOMATE > MERGE TO HDR. Allow time for processing, perhaps a few minutes and you will get the photo in the middle above. Nice but not startling.

If you want the illustrative effect from Photomatix seen in the top photo, you need to get the plugin or standalone program. Prices start at about $100 US and go up from there depending on version and bells and whistles. See http://www.hdrsoft.com/ for more info on what is best for you. For my version, I first load Photomatix Pro, then select the files from there. More on Photomatix in another post.

Click here to see more of my HDR work.

Sunday, November 15, 2009

PHOTOGRAPHING SURPRISES! Being Ready


There are of course, many ways to shoot subjects but they can be boiled down to planned shots, incidental, or shot in the normal course of observing, but there is a third distinct category I love: SURPRISE! These occur outside the other two circumstances.

And you need to have your equipment ready and WITHIN REACH. This means batteries and cards with capacity, camera available to pick up and use, not "safely" in a bag. I usually carry THREE sets of batteries. You will discover battery failure only when shooting. This will leave you hopefully with two sets of batteries ready to shoot.

The deer above IS inside the car. The camera was two feet away when she suddenly stuck her head in the window. Shooting was natural and the results show it. You need to be ready. Click here to see more from the day's shoot in New Zealand.

JA


UPDIG - Forerunner in Best Practices, PRO TOPIC


The attached link is from John Harrington's Blog. UPDIG (Universal Photographic Digital Imaging Guidelines) has been around since 2005 as mentioned in the 2008 article and has been a pioneer in Best Practices and standardization.
Click here for more.
JA

Visit UPDIG:
http://www.updig.org/

Saturday, November 14, 2009

ASMP Announces Digital Workflow Best Practices Site

ASMP is the American Society of Media Photographers. Exciting news for those who are serious about your digital work. Workflow is an important topic related to Organizing, Retrieving and safely Archiving images.
Check out the site below.

http://www.dpBestflow.org/


Wednesday, November 11, 2009

NEWBIE: Basic Book on Digital Photography

I spent an hour today at the NYC 14th Street Barnes & Noble to see what the latest BASIC books on photography were worth recommending. There were certain criteria:

1. Short, as opposed to Encyclopedic. Beginners need a few topics to master, then get into the weeds of detail.

2. Emphasized traditional, essential conceptual photographic topics, rather than Megapixels or technology and marketing blather

3. Visually appealing and easy to follow.

4. "Inexpensive." A newbie is not going to spend $600 of the household piggy bank on learning RosettaPhotoGraphy if there is only budding interest in a potential fad.

There were a few that came close and only one hands down winner:


1. It is only 160 pages. Short.

2. Arranged by topics of:
  • All that digital stuff
  • Aperature
  • Shutter Speed
  • Light
  • Composition
  • Photoshop Digital Darkroom
  • Index
As a beginner, Peterson hits the required grounding of the principles of Photography.

3. Visually Appealing. Well laid out. Not a "technical slog" that will end up thrown out next year with the next release of Photoshop.

4. Inexpensive. List is $26 US. I got it for $21 minus my additional B&N discount. Less than that is nothing and would be worth every penny you paid. May be cheaper on Amazon (Link below) depending on shipping.


RICK SAMMON PRESENTS AT B&H - ALL LEVELS

There are a couple of wildly successful standouts from a consumer standpoint in the battered Retail sector. Apple Computer and their Retail stores and B&H Photo's Event Space. Both organizations use a philosophy of offering FREE infomercial seminars to explain how to use equipment and software they sell. They appeal to all levels of experience, from Newbie to Pro.

I attended Rick Sammon's Lighting Seminar & Location Outdoor Shootout for the last two days along with 80 other Photographers. Yes it was free. Sponsored also by Westcott Lighting, B&H provided professional models and we spent from 11-12 discussing the plan to shoot for the afternoon. From 2 - 4:30 we shot using the equipment, assistants, presenters and models. You can signup for B&H e-mail alerts to find out about the Events at BHPHOTOVIDEO.COM. Hint: signup ASAP, prime seminars go fast.


Click here to see the results with models Veronica Rosa, Laurence Yang and Beatriz Carranza. Laurence is on the railing above.

Monday, November 9, 2009

MAC MEMORY CARD REMOVAL ERROR MESSAGES


If you have an Apple Mac, you may have found out that it behaves a bit differently than Windows. One difference is that you must first do a software EJECT command for a memory card or other "device" like an external hard drive before physically removing or disconnecting it from the computer. Many times, you will get a message that data on your device might be corrupted if you did not EJECT properly.

Most times, I have found that the data did not get corrupted. But here is a dirty little secret I just read. In Peter Krogh's the DAM Book, Second Edition, he has a tip that addresses this issue (DAM is Digital Asset Management).

He suggests that the NEXT CARD YOU INSERT might become corrupt. He recommends you save your data and REBOOT your computer to prevent corruption of any subsequent card inserted after the error message is observed. More on the DAM Book to come.

http://www.amazon.com/s/ref=nb_ss_1_4?url=search-alias%3Daps&field-keywords=dam+book&x=0&y=0&sprefix=dam+

Friday, November 6, 2009

IKELITE SLR HOUSING PORT LOCK MODIFICATIONS

Ikelite has announced that they are offering an upgrade in their port locks to FOUR LOCKS instead of the traditional TWO. I have second hand accounts that say that some people using the new 8" dome have not secured their ports correctly and this resulted in flooding. The new four lock system should prevent this.

Ikelite is generously offering to upgrade housings by replacing the front of the housing for $150, this is the cost of a normal housing tuneup. As an option, they are offering to tune up your old housing back for $50.00. I have been using Ikelite housings since 1980 and never flooded a camera.

Click Here for complete details. It will cost from $150 - $200 for the upgrade.

Finespot Jawfish, LaPaz, Mexico.

Click here to see my Underwater Collection.


Monday, November 2, 2009

SUBTLETIES: A Sunset is not a always a Sunset

I found out the semantics of "Sunset" in Greece this last July. During the three hour hike from Fira to Oia in Santorini, I found out that sunset has a very different meaning to different people. I was after that special glow found just before the sun goes down and the purplish tones that appear right after sunset. Galen Rowell calls this the "Magic hour." To most people, sunset means pointing the lens directly at our nearest star. Since then I try to differentiate when I say I am going to make some Dusk photos.


See the rest of the series here.


Friday, October 30, 2009

Special Event: NYUPS Presents Emory Kristof

From NYUPS:

NYUPS is proud to present “20,000 Bytes Under The Sea”, a special presentation by legendary National Geographic photographer and IMAX filmmaker, Emory Kristof.

Emory Kristof has been a National Geographic photographer ever since working for the magazine as an intern in 1963.

Admission is complimentary, and seating is limited. We do expect a full house and you must RSVP to attend. If you do not RSVP and receive a confirmation, then you are not on the guest list.

Time: October 30, 2009 from 7pm to 10:30pm
Location: Bleecker Street Theater
Street: 45 Bleecker Street
City/Town: New York City
Website or Map: http://bit.ly/ZT9Od

See the NYUPS web site for complete details:

http://www.nyups.org/events/special-event-nyups-presents

Thursday, October 29, 2009

Lightroom 3.0 Beta is Available


(Click on image to enlarge)

I live in Lightroom so this is a big deal.

According to Abobe:
Some of the new features included for you to play with in the Lightroom 3 beta are:

  • Brand new performance architecture, building for the future of growing image libraries
  • State-of-the-art noise reduction to help you perfect your high ISO shots
  • Watermarking tool that helps you customize and protect your images with ease
  • Portable sharable slideshows with audio—designed to give you more flexibility and impact on how you choose to share your images, you can now save and export your slideshows as videos and include audio
  • Flexible customizable print package creation so your print package layouts are all your own
  • Film grain simulation tool for enhancing your images to look as gritty as you want
  • New import handling designed to make importing streamlined and easy
  • More flexible online publishing options so you can post your images online to certain online photo sharing sites directly from inside Lightroom 3 beta (may require third-party plug-ins)*

http://labs.adobe.com/technologies/lightroom3/

Wednesday, October 28, 2009

STOCK ARTISTS ALLIANCE MERGER with ALLIANCE OF VISUAL ARTISTS

The Stock Artists Alliance (SAA) has been the only professional organization fully devoted the interests of Stock Photographers for the past 10 years. It is now part of AVA as noted below and this is a step forward.


Read this release on our website http://www.stockartistsalliance.org/Stock-Artists-


Merger with Alliance of Visual Artists creates strength in numbers for advocacy, education and networking.

October 8, 2009 - Atlanta

The Stock Artists Alliance (SAA) announced today that it will merge with the Alliance of Visual Artists (AVA), an umbrella organization representing five photographic associations and some 45,000 professional photographers worldwide.

SAA, the only photography association dedicated specifically to the needs of professional stock photographers, represents more than 400 members. With the merger of the two groups, it becomes the sixth photographic association to join AVA's family, which also includes Professional Photographers of America (PPA), Society of Sport and Event Photographers (SEP), Evidence Photographers International Council (EPIC), Student Photographic Society (SPS) and Commercial Photographers International (CPI). The merger becomes effective immediately.

"This is an exciting time for all of our AVA associations," comments AVA chief executive David Trust. "By joining together, each of our associations is able to keep a unique identity, while tapping into operating efficiencies and economies of scale. And that translates into greater benefits for all members."

One of the most significant, immediate benefits of the merger for SAA is newly acquired strength in numbers on Capitol Hill. A longtime active proponent for copyright, SAA can now join AVA's more aggressive and well-funded lobbying campaign, effectively giving all six associations a greater voice. Current advocacy efforts on Capitol Hill are focused on the national debate on health care and its accessibility to photographers and other small businesses, while continually spreading the pro-copyright message.

"We are witnessing a revolutionized business model in our midst," says Shannon Fagan, president of SAA. "Stock photography licensing has evolved and methodologies have changed. What we considered as protocol is no longer, and it is our duty as active professionals to retool, rethink and realign our goals. We are extremely proud of SAA's success, and we are pleased to align ourselves with AVA to give our members the best opportunities for sustained growth and leadership in this rapidly changing industry."

In addition to the added influence in Washington, the merger opens up new educational and networking opportunities for all association members. SAA members will have access to AVA's bundle of membership benefits. The addition of SAA will also widen the educational scope of Imaging USA, the first photographic convention and expo of the year, hosted each year by AVA. With today's merger, a slate of classes dedicated specifically to stock photography will be planned for the January 10, 2010, event.

"We learned early on that photographers want to associate with people with like interests and business models," adds Claire White, AVA's Allied Associations manager. "This type of merger only works if each organization can keep its identity as it contributes to the combined success of the whole. SAA brings a unique perspective that was needed in our group. We are thrilled to welcome them into the fold."

About the Alliance of Visual Artists (AVA):

Better known for its largest association, Professional Photographers of America, AVA also holds the Society of Sport and Event Photographers, Commercial Photographers International, Evidence Photographers International Council, the Student Photographic Society and now the Stock Artists Alliance. As the world's largest umbrella group of professional photography associations, AVA exists to increase the benefits and services to professional photographers through the professional and efficient administration of photographic and other visually-oriented associations. For more information, please visit www.AllianceofVisualArtists.com.

About Stock Artists Alliance (SAA):

SAA is the only trade association focused on the business of stock photography. SAA supports its membership with exclusive benefits to enable and enhance their stock businesses. SAA also speaks up for the interests of stock artists with a clear and powerful voice in the licensing industry. The heart of SAA's mission is education and advocacy concerning core issues, such as the need to better protect and promote licensing through the use of standardized metadata. Learn more at www.stockartistsalliance.org.

Contact:

Claire White, Allied Association Manager
Alliance of Visual Artists
404.522.8600, ext. 254
cwhite@ppa.com


Contact Information
Executive Director: SAAexecdirector@stockartistsalliance.org
Membership Coordinator: Inna Spivakova - SAAadmin@stockartistsalliance.org
www.stockartistsalliance.org

BOOK REVIEW: Galen Rowell's Inner Game of Outdoor Photography


The late Galen Rowell's Inner Game of Outdoor Photography is perhaps the finest book on Photography I have read. It is a compilation of articles he wrote for Outdoor Photography Magazine. It is copyright 2001, so much of what he writes predates the digital age. But is not really a book on technique as much as "seeing." The first third of the book is worth the price of entry alone. The book is divided into four parts:
  • Visions
  • Preparations
  • Journeys
  • Realizations

Rowell is a master teacher and visual artist. This is for intermediate and advanced photographers that want to hone their skills even further. Some of his observations include:
  • "[Photographs] are visual illusions that trick our senses into believing that the images represent theyway the eye would see a real scene."
  • "Cameras capable of making great photographs have become commonplace but photographers have not. While technical innovations have made photography even easier in recent decades, the art of producing images that other people will care about has become even more formidable."
  • "Literal images of nature no longer wow the public."
  • "...a visionary image communicates the intentionality of the artist's experience."
  • "The best pictures show us a world different from the one we directly observe."
  • "We all take pictures to communicate what is important in our lives."
All these quotes are just in the first three pages of the Preface. To paraphrase Al Pacino from "Scent of a Woman," HE'S JUST GETTING STARTED!

 You can purchase Galen Rowell's Inner Game of Outdoor Photography here.
.

Wednesday, October 21, 2009

PHOTO PLUS EXPO - Starts Tomorrow Oct 22- 24

At the Javits Center in NYC. This is the largest Advanced Amateur / Professional Photography show in the country. Expo floor and Seminars by the Who's Who in Photography. Go if you want to improve your photography and see the latest in tools and equipment.

http://www.photoplusexpo.com/ppe/index.jsp

BOOK REVIEW: Photographing Birds

When I was a kid, I was a naturalist at heart. Maybe it started at age 6 with impromptu talks the nuns selected me to give to the 8th grade. I used the Powerpoint of the time, a book on Fish. Birds get a bad rap. I have heard people downgrade birds as being something for "old people." How does an entire classification of biology get associated with an age group? What age group are Amoeba associated with?

BIRDS and FISH exhibit the same hard to photograph behavior as individuals and in schools or flocks. True, you need much more equipment and training to photograph fish. But the "eye," focus on behavior, concentration and fast reflexes are the same.


PHOTOGRAPHING BIRDS by Rulon Simmons and Bates Littlehales of Nat Geo fame is a great book. These veterans share their secrets of different methods such as feeding, vs stalking, vs blinds, nesting, flight, etc.

There are sections on using remote controllers and accessory tree limbs on feeders. I shot the Cardinal below using these techniques. This alone was worth the price of admission for me. Some text is still back in the film era, but most is still valid in the digital age because of its concentration on the subject matter: the birds.


You can purchase PHOTOGRAPHING BIRDS by Rulon Simmons and Bates Littlehales here.

See my gallery of birds.
JA


Sunday, October 18, 2009

BASICS: Using the Levels Tool to get WOW!

The worst comment a photographer can get on their work is "NICE" or "INTERESTING." If your photography is not generating WOW reactions, this technique could help. Many factors of course effect the WOW reaction, but for photos to be dramatic or LEAP off the page, you must edit using some kind of Editor such as Photoshop Elements, Paintshop pro or iPhoto.

Despite all the marketing, digital cameras do not always produce perfect photos. Today's cameras are after all, dumb computers with a lens attached. An Editor can quickly correct TONAL RANGE problems, the factor that is responsible for photos looking muddy or "lacking something."

The quickest way to get the most out of the tonal range is to use the LEVELS tool to set the White point, Black Point and Contrast or Gamma. A Japanese photographer named Sammy (Masafumi Tanaka) taught me how to do this in five minutes in the Maldives back in 2003. It got me hooked on the power of digital editing. As this is a powerful tool that changes the picture, you may want to first make a copy of the file as you practice. You can also CLOSE the picture without saving if you are not happy with the results.

1. Open the Editor application. In this example, we are using Photoshop Elements.
2. Open a picture
3. Press the COMMAND + L keys (Mac) or CTRL + L (Win) and the following histogram shows up. Very similar to your camera histogram. In iPhoto, click Edit your picture and click the Adjust Icon. For others, check for Levels help.


In this example, the photo has poor tonal range in both the shadows (to the left) and the highlights (to the right). This shape of the Histogram "mountain" tells us this. The picture will have a muddy quality to it. Using the controls it is easy to improve this picture.

1. Click and hold your left mouse button on the White Point slider, circled here in Yellow.
2. Drag it toward the left until it almost touches the "mountain" of the Histogram.
3. Repeat with the Black Point slider, circled here in Red.
4. Drag it toward the right until it almost touches the other side of the "mountain."
Your picture will appear "crisper"and the controls will be in their new positions as shown:


The last control is to adjust the center Gamma slider (or Contrast) circled in green. Click and hold and move to the left and right slightly to see the effect and leave it where you think best.

Save your picture when you are happy with the result.

If you reopen the Levels tool, the changes to the histogram are evident showing a much better tonal range, one step closer to WOW! Once you are proficient with Levels, it will be time to explore the next step up in editing sophistication, the Curves Tool.


Friday, October 16, 2009

ALTERNATE FOCUS POINT TECHNIQUE - FOCUS LOCK

In discussing the previous two focus point technique posts with photographer Polina Resnikov, she offered an alternate technique that could be faster, especially when using an underwater housing. The technique is called using Focus Lock & Recomposition. This technique is not suitable for subjects moving very quickly toward or away from the camera. A continuous Focus Mode is more suitable in this situation.

1. Be sure your camera
auto focus mode is set properly. For example, Canon D-SLRs need to be set in the One-Shot AF

2. Select the
Center focus point.

3. Point the focus point on the subject you want the sharpest, then press and HOLD the shutter half way down. The setting will be remembered as long as you hold the button half way down.

4.
RECOMPOSE correctly and take the picture.

You can repeat the procedure as needed and refocus just by letting go of the shutter release and repeating steps 3 & 4.

Check your manual to verify the procedure for your camera.

U/W NOTE: If shooting underwater with an SLR, you need to be
sensitive to when & where the shutter control is halfway down. Practice on land, this is a tactile skill. Some housing's springs on the shutter control desensitize detecting where the halfway point is.

Thursday, October 15, 2009

BENEFITS OF USING A BATTERY GRIP

This picks up from the previous post on Focus Points.

There are at least four benefits to using a battery grip:
  1. Using an accessory Battery Grip on your SLR can also aid greatly in being able to change focus points while shooting a vertical composition. Some Pro quality cameras have battery grips built in. The grips typically have additional focus point buttons and a shutter release to allow you to change Focus Points quickly without taking your eye from the finder. This is crucial for nature or any fast moving subject. Note that many underwater housings will NOT accept the addition of a battery grip as space is very limited.
  2. Your shooting time can be extended as you can install two batteries at the same time. I can get an entire morning or afternoon on two batteries. Normally I'd have to change batteries after an hour or two. A distraction in the heat of great session.
  3. Many come with a AA battery tray so you can use AA's in a emergency.
  4. This one is subtle. If you put a grip on a Pro-Am camera like a Canon 50D, it now looks like an $8000 EOS 1Ds Mark III to the untrained eye. In other words, you look like a real pro. It has been said that wearing a camera is a license to explore. The battery grip can give you extra edge in getting "access" for better photos,i.e. credibility). Be careful where you want to brandish this appearance. Sometimes a little Canon G10 is better by being less intimidating.
The downside of using battery grips are the additional weight and bulk and the fact that you LOOK like you have a lot of money to invest in a REALLY expensive camera.

Wednesday, October 14, 2009

INTERMEDIATE TECHNIQUE: CAMERA FOCUS POINT

This expands on the TIPS - General Photography in the sidebar.

CAMERA FOCUS POINT
Having a sharply focused image is crucial to the success of a photograph. When shooting kids, animals or underwater, use the centered focus point on your SLR. SLRs have multiple, selectable "Focus Points" as a standard feature. Most allow you to let the camera decide what you had in mind or allow you to select the correct point. There may be 5 or more points visible in the viewfinder to choose from depending the camera. The are usually shown by a pattern of little squares in the viewfinder. Pressing the shutter button halfway down will usually show the selected point and you may hear a beep if the point is determined to be "sharp." You and your camera manual will need to be good friends to be sure you know how to select the correct one. Practice using the feature. You will lose fluency on this if you don't shoot at least every two weeks.

Point and shoot cameras probably won't have this feature. Using the center point allows you get the animal in focus. Alternatively, you may need to adjust the focus point to be situated directly on one of the animal’s eyes to get the best perceived sharpness. Letting the camera decide the focus point will not give you optimum results as the camera may keep searching for what should be in focus or determine the wrong point. Most digital cameras these days function as programmed computers, not photographers with a thinking brain.

Monday, September 21, 2009

IDENTIFICATION BOOK- Nudibranchs of the World

"Save the oceans, become a diver." How often have we heard this in the last five years? How does one do this exactly? Underwater photographers are in an enviable position to positively impact what is happening in the oceans by providing a photographic record of what is there and NOT there. Only by identifying what the creatures are, can we begin to contribute to the body of knowledge of the oceans. Click here to see a few of my nudibranchs from Sulawesi.

"Remember those big round things with the spikes? We don't see them anymore," won't be helpful in recording the decline of a species. Click below to see the full story...
JA

Digital Nikonos Industry Design Challenge

Are all of the Nikonos systems out there really just paperweights? Are the superior optics of Nikonos lenses such as the 15mm or RS lenses really never going to see the light of day (or water) again? Is it really impossible to produce adapters that will allow owners of these fine pieces of equipment to utilize them in today's digital age? Click below to see the full story...
JA


Underwater Photography DSLR Packing Checklist

Let's face it, if you're shooting underwater photography with a DSLR, you've got a lot to think about when packing for a dive trip.

Click here for the original article in DivePhotoGuide.com

GET SMART ABOUT METADATA

MetaData is an important topic for anyone who shoots Digital and want to A) Find your photos or B) Wants to share them with others.
JA

U/W Point And Shoot Packing Checklist

Critical organizing tool for Point and Shoot Underwater Photographers.
JA


DIGITAL UNDERWATER PHOTOGRAPHER'S TO-DO LIST

Adapted from a Stock Artists's Alliance mail. Still you wonder where the time goes. Here is a good explanation.
JA

Tuesday, July 14, 2009

2009-7-14 John Ares Photographic Blog

John Ares Photographic will expand its blog by making this the home for White Papers, Downloads, Tips and other news. Stay tuned as we gear up.
John

Tuesday, March 3, 2009

Sunday, February 1, 2009

Photoshop Editing Workshop

John will will conducting a Photoshop Lightroom Workshop on February 3, 2009 in NYC


http://www.nyups.org/xn/detail/1971284:Event:7207