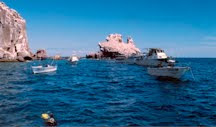
This is a surface shot of boats in Los Islotes, Mexico. BE RESPONSIBLE FOR YOURSELF. ALWAYS TRY EDITS ON A DUPLICATE IMAGE. NEVER TRY NEW EDITING TECHNIQUES ON YOUR ONLY COPY. PHOTOSHOP unlike Lightroom IS DESIGNED FOR DESTRUCTIVE EDITING AND CHANGES PIXELS.
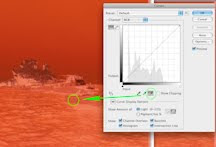
1. Load your image in Photoshop and go to CURVES (Mac: Command + M; Win: Ctrl + M).
1A. For Photoshop Elements Users: Load your Image and go to LEVELS (Mac: Command + L; Win: Ctrl + L).
2. Select the White Point Dropper inside the green circle on the right, as shown above.
3. Click on a "likely" white object in your scene as shown in the left hand green circle, and click OK to close.
This may be tricky to find the correct spot, so be patient, this is an art not a science. You may need to cancel and do this a number of times until you get an image below that is fairly close to what you expect. You are essentially picking a spot that will tell Photoshop how to remove the orange mask in the Negative. As this is not an automated action, the film stock/mask (Kodak, Fuji) does not matter. One would think that someone would come up with a reliable, duplicatable conversion that measures the orange mask of Fuji vs Kodak vs Agfa, Konica, et. al.
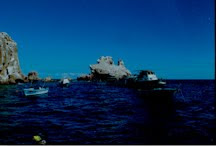
4. Use the INVERT command (Image / Adjustment / Invert) or (Mac: Command + I; Win: Ctrl + I)
(4a For Photoshop Elements Users: Filter / Adjustments/ Invert) or (Mac: Command + I; Win: Ctrl + I)

This image is dirty and slightly off color but somewhat close compared to the negative. Now you need to use your established editing skills to polish up the color to something acceptable.

Final result is pretty good. The colors are believable and the sky is cleaned of dust and dirt despite having been cleaned before scanning.
If anyone has suggestions for reliable BATCH methods, I will be happy to try them out. I am hoping the next version of Lightroom has something that will be "of industrial strength."
Click here to see other images from Los Islotes, LaPaz, Mexico.


Wow, you just saved me hours of time! Using the levels eyedropper is the trick I needed to make my negative conversions work. I've been using a negative adapter on my lens and couldn't get Lightroom or Photoshop to flip the image right without all sorts of color distortion and reduced dynamic range.
ReplyDeleteThanks so much!
Earguy
I've been playing with converting my negatives, and as I noted, your tip was a big help.
ReplyDeleteHowever, I discovered something myself: Set your white balance to Kelvin, and shoot your color negatives at 2500 deg K. Then CTRL-i your image in Photoshop, and that's it! I find the color to be very close without any more adjustments necessary for your typical snapshot, though I'll often click autocolor which gives more saturation.